在Java中如何实现自己的annotation

1. 先定义annotation

2. 使用annotation

例子:

import java.lang.annotation.*;
import java.lang.reflect.Method;

@Target(ElementType.METHOD)
@Retention(RetentionPolicy.RUNTIME)
@interface Test {
    String info() default "";
}

class Annotated {
    @Test(info = "AWESOME")
    public void foo(String myParam) {
        System.out.println("This is " + myParam);
    }
}

class TestAnnotationParser {
    public void parse(Class clazz) throws Exception {
        Method[] methods = clazz.getMethods();

        for (Method method : methods) {
            if (method.isAnnotationPresent(Test.class)) {
                Test test = method.getAnnotation(Test.class);
                String info = test.info();

                if ("AWESOME".equals(info)) {
                    System.out.println("info is awesome!");
                    // try to invoke the method with param
                    method.invoke(Annotated.class.newInstance(), info);
                }
            }
        }
    }

}

public class Demo {
    public static void main(String[] args) throws Exception {
        TestAnnotationParser parser = new TestAnnotationParser();
        parser.parse(Annotated.class);
    }
}

程序输出:

info is awesome!

This is AWESOME

http://isagoksu.com/2009/development/java/creating-custom-annotations-and-
making-use-of-them/
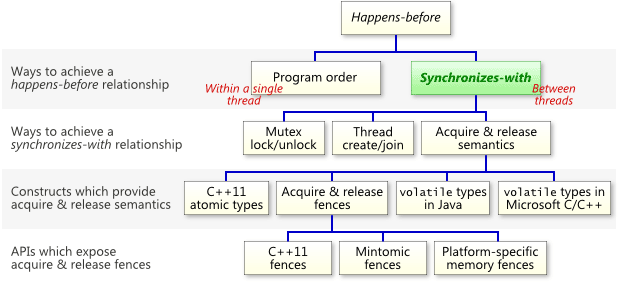
什么是Java中的happen-before关系

“Let A and B represent operations performed by a multithreaded process. If A
_happens-before _ B, then the memory effects of A effectively become
visible to the thread performing B before B is performed.”

简单说如果两个actionA和B是happes-before关系,那么action A对内存的操作多B可见。

http://preshing.com/20130702/the-happens-before-relation/

http://docs.oracle.com/javase/specs/jls/se5.0/html/memory.html

Java中如何实现happens-before关系:

1、程序次序规则:在一个单独的线程中,按照程序代码的执行流顺序,(时间上)先执行的操作happen—before(时间上)后执行的操作。

2、管理锁定规则:一个unlock操作happen—before后面(时间上的先后顺序,下同)对同一个锁的lock操作。

3、volatile变量规则:对一个volatile变量的写操作happen—before后面对该变量的读操作。

4、线程启动规则:Thread对象的start()方法happen—before此线程的每一个动作。

5、线程终止规则:线程的所有操作都happen—before对此线程的终止检测,可以通过Thread.join()方法结束、Thread.isAlive()的返回值等手段检测到线程已经终止执行。

6、线程中断规则:对线程interrupt()方法的调用happen—before发生于被中断线程的代码检测到中断时事件的发生。

7、对象终结规则:一个对象的初始化完成(构造函数执行结束)happen—before它的finalize()方法的开始。

8、传递性:如果操作A happen—before操作B,操作B happen—before操作C,那么可以得出A happen—before操作C。

http://blog.csdn.net/ns_code/article/details/17348313

各种语言中可以实现happens-before的操作:

http://preshing.com/20130823/the-synchronizes-with-relation/

Java中static和volatile的区别

今天去面试,把transient当成volatile说了,很是丢脸,今天在这里记录一下。

1. 首先说一下什么是transient。

1) transient keyword is used along with instance variables to exclude them from serialization process. if a field is transient
its value will not be persisted. see my post what is transient keyword in
java
for more details. On the other hand volatile keyword can also be
used in variables to indicate compiler and JVM that always read its value from
main memory and follow happens-before relationship on visibility of volatile
variable among multiple thread. see my post how and when to use volatile
keyword in Java
for more details.
transient就是在序列化时,标记变量,不用被序列化。

2) transient keyword can not be used along with static keyword but volatile
can be used along with static.

语义上来说,transient是可以被static修饰的,但是没有什么实际意义。

3) transient variables are initialized with default value during de-
serialization and there assignment or restoration of value has to be handled
by application code.
在反序列化时,transient变量会被初始化成初始值,应用程序自己需要自己在处理它们的值。

Read more: http://javarevisited.blogspot.com/2012/03/difference-between-
transient-and.html#ixzz2siNRg1eC

2. 啰嗦完毕,言归正传,那么static和volatile的区别是什么呢?

static是Object之间共享的变量;static变量可能会被线程cache;static可以修饰volatile
volatile是线程之间共享的变量;

http://malalanayake.wordpress.com/2013/09/12/volatile-vs-static-in-java/

http://javarevisited.blogspot.de/2011/06/volatile-keyword-
java-example-tutorial.html

例子一:

public class VolatileExample {
    public static void main(String args[]) {
        new ExampleThread("Thread 1 ").start();
        new ExampleThread("Thread 2 ").start();
    }
}

class ExampleThread extends Thread {
    private static double testValue = 1;
    private static boolean isExit = false;

    public ExampleThread(String str) {
        super(str);
    }

    @Override
    public void run() {
        if (getName().compareTo("Thread 2 ") == 0) {
            while (true) {
                System.out.println(getName() + "Test Value T2: " + testValue);

                try {
                    Thread.sleep(10);
                } catch (InterruptedException e) {
                    e.printStackTrace();
                }

                if (isExit) {
                    return;
                }
            }
        }


        for (int i = 0; i < 10; i++) {
            try {
                if (getName().compareTo("Thread 1 ") == 0) {
                    testValue++;
                    System.out.println(getName() + "Test Value T1: " + testValue);

                    Thread.sleep(100);

                    if(i == 9) {
                        isExit = true;
                    }
                }                

            } catch (InterruptedException exception) {
                exception.printStackTrace();
            }
        }        
    }
}

上面的代码运行结果是:

Thread 2 Test Value T2: 2.0
Thread 1 Test Value T1: 2.0
Thread 2 Test Value T2: 2.0
Thread 1 Test Value T1: 3.0
Thread 2 Test Value T2: 3.0
Thread 1 Test Value T1: 4.0
Thread 2 Test Value T2: 4.0
Thread 1 Test Value T1: 5.0
Thread 2 Test Value T2: 5.0
Thread 1 Test Value T1: 6.0
Thread 2 Test Value T2: 6.0
Thread 1 Test Value T1: 7.0
Thread 2 Test Value T2: 7.0
Thread 1 Test Value T1: 8.0
Thread 2 Test Value T2: 8.0
Thread 1 Test Value T1: 9.0
Thread 2 Test Value T2: 9.0
Thread 1 Test Value T1: 10.0
Thread 2 Test Value T2: 10.0
Thread 1 Test Value T1: 11.0
Thread 2 Test Value T2: 11.0

从这里可以看到,static变量在不通的线程之间是可以共享的,这好像和上面说的不一样?

每次线程1改变testValue之后,线程2都能取道改变后的值。

其实例子的输出和CPU和JVM的版本都有关系,JVM不保证变量在不同的线程之间是可见的,只有线程之间建立了happen-before关系。

什么是SICL,什么是VISA

What is SICL?

Agilent Standard Instrument Control Library (SICL) is an I/O Library developed
by Agilent (HP) that is portable across many interfaces and systems. SICL is a
modular instrument communications library that works with a variety of
computer architectures, I/O interfaces, and operating systems. Applications
written in C/C++ or Visual Basic using this library can be ported at the
source code level from one system to another with no (or very few) changes.

SICL uses standard, commonly used functions to communicate over a variety of
interfaces. For example, a program written to communicate with a particular
instrument on a given interface can also communicate with an equivalent
instrument on a different type of interface.


What is VISA?

Agilent Virtual Instrument Software Architecture (VISA) is an I/O Library
designed according to the VXIplug &play System Alliance that allows software
developed from different vendors to run on the same system.

Use VISA if you want to use VXIplug&play instrument drivers in your
applications, or if you want the I/O applications or instrument drivers that
you develop to be compliant with VXIplug&play standards.

可以使用iosetup来对相关的设备进行设置,在设置完成后,可以使用iclear使得设置生效。

refs: http://www.techsoft.de/documents/sicl_visa.html

swing 中如何将CheckBox加入ComboBox

import java.awt.*;  

public class CheckCombo implements ActionListener  
{  
    public void actionPerformed(ActionEvent e)  
    {  
        JComboBox cb = (JComboBox)e.getSource();  
        CheckComboStore store = (CheckComboStore)cb.getSelectedItem();  
        CheckComboRenderer ccr = (CheckComboRenderer)cb.getRenderer();  
        ccr.checkBox.setSelected((store.state = !store.state));  
    }  

    private JPanel getContent()  
    {  
        String[] ids = { "north", "west", "south", "east" };  
        Boolean[] values =  
        {  
            Boolean.TRUE, Boolean.FALSE, Boolean.FALSE, Boolean.FALSE  
        };  
        CheckComboStore[] stores = new CheckComboStore[ids.length];  
        for(int j = 0; j < ids.length; j++)  
            stores[j] = new CheckComboStore(ids[j], values[j]);  
        JComboBox combo = new JComboBox(stores);  
        combo.setRenderer(new CheckComboRenderer());  
        combo.addActionListener(this);  
        JPanel panel = new JPanel();  
        panel.add(combo);  
        return panel;  
    }  

    public static void main(String[] args)  
    {  
        JFrame f = new JFrame();  
        f.setDefaultCloseOperation(JFrame.EXIT_ON_CLOSE);  
        f.getContentPane().add(new CheckCombo().getContent());  
        f.setSize(300,160);  
        f.setLocation(200,200);  
        f.setVisible(true);  
    }  
}  

/** adapted from comment section of ListCellRenderer api */  
class CheckComboRenderer implements ListCellRenderer  
{  
    JCheckBox checkBox;  

    public CheckComboRenderer()  
    {  
        checkBox = new JCheckBox();  
    }  
    @Override
    public Component getListCellRendererComponent(JList list,  
                                                  Object value,  
                                                  int index,  
                                                  boolean isSelected,  
                                                  boolean cellHasFocus)  
    {  
        CheckComboStore store = (CheckComboStore)value;  
        checkBox.setText(store.id);  
        checkBox.setSelected(((Boolean)store.state).booleanValue());  
        checkBox.setBackground(isSelected ? Color.red : Color.white);  
        checkBox.setForeground(isSelected ? Color.white : Color.black);  
        return checkBox;  
    }  
}  

class CheckComboStore  
{  
    String id;  
    Boolean state;  

    public CheckComboStore(String id, Boolean state)  
    {  
        this.id = id;  
        this.state = state;  
    }  
}  

其实关键就是combo.setRenderer(new CheckComboRenderer());
自己定义renderer就好了。

下图是运行的结果:

refs:

http://www.coderanch.com/t/343024/GUI/java/Components-JComboBox

common lisp中的funcall

common lisp:
http://www.gigamonkeys.com/book/
http://acl.readthedocs.org/en/latest/zhCN/

CL-USER> (remove-if-not #’evenp ‘(1 2 3 4 5 6 7 8 9 10))
(2 4 6 8 10)

In this case, the predicate is the function EVENP, which returns true if its
argument is an even number.
The funny notation #’ is shorthand for “Get me the function with the following
name.”
Without the #’, Lisp would treat evenp as the name of a variable and look up
the value of the variable, not the function.

Common Lisp provides two functions for invoking a function through a function
object: FUNCALL and APPLY.
Like FUNCALL, the first argument to APPLY is a function object. But after the
function object, instead of individual arguments, it expects a list.
(defun foo(a b c) (list a b c))
(foo 1 2 3)

(funcall #’foo 1 2 3)
(apply #’foo (list 1 2 3))
(apply #’foo 1 (list 2 3))
(apply #’foo 1 2 (list 3))

CL-USER> (let ((count 0)) #’(lambda () (setf count (1+ count))))

#

(defparameter fn (let ((count 0)) #’(lambda () (setf count (1+ count)))))
CL-USER> (funcall fn)
1
CL-USER> (funcall fn)
2
CL-USER> (funcall fn)
3

each macro defines its own syntax, determining how the s-expressions it’s
passed are turned into Lisp forms. With macros as part of the core language
it’s possible to build new syntax–control constructs such as WHEN, DOLIST,
and LOOP as well as definitional forms such as DEFUN and DEFPARAMETER–as part
of the “standard library” rather than having to hardwire them into the core.
This has implications for how the language itself is implemented, but as a
Lisp programmer you’ll care more that it gives you another way to extend the
language, making it a better language for expressing solutions to your
particular programming problems.

the job of a macro isn’t to do anything directly–its job is to generate code
that will later do what you want.

我们可以用 ‘ 作为 quote(…) 的缩写,也可以用 #’ 作为 function(…) 的缩写:

(defun plus(x y) (+ x y))
PLUS
(plus 1 4)
5
(funcall #’plus 1 4)
5
(funcall (function plus) 1 4)
5
(apply #’plus (list 1 4))
5
(apply (function plus) (list 1 4))
5

#’plus

#

#’+

#

(function plus)

#

(function +)

#

((x) (+ x 100)) and
(lambda (x) (+ x 100)) is same
but we used to use lambda to express anonymous function
lambda表达式本身就是一个函数

使用prelude的 emacs配置

0. back up you .emacs and .emacs.d file and directory
1. install
curl -L https://github.com/bbatsov/prelude/raw/master/utils/installer.sh | sh
2. update all package list
3. enjoy
emacs –daemon
Afterwards I connect to the server with either a terminal or a GUI client like
this:
emacsclient -t
emacsclient -c

You’d probably do well to put a few aliases in your .zshrc (or .bashrc):
alias e=’/usr/local/bin/emacsclient -t’
alias ec=’/usr/local/bin/emacsclient -c’
alias vim=’/usr/local/bin/emacsclient -t’
alias vi=’/usr/local/bin/emacsclient -t’

https://github.com/bbatsov/prelude

如何在Linux上安装和配置commo lisp环境

1. install Steel Bank Common Lisp from:
http://www.sbcl.org/platform-table.html
tar -xjf sbcl-1.0.58-x86-linux-binary.tar.bz2
cd sbcl-1.0.58-x86-linux
su
sh install.sh
sbcl is install to /usr/local/bin/sbcl
using (quit) to quit

2. downlaod emacs from:
http://mirror.bjtu.edu.cn/gnu/emacs/
./configure
make
make install

3. download quicklisp from:
http://beta.quicklisp.org/quicklisp.lisp
quicklistp is used to search for and install Common Lisp libraries
Next, run sbcl and type in the following:
(load “/path/to/quicklisp.lisp”)
After it loads, run:
(quicklisp-quickstart:install)
Quicklisp will install by default in ~/quicklisp
Finally, run:
(ql:add-to-init-file)

$cat ~/.sbclrc

;;; The following lines added by ql:add-to-init-file:

#-quicklisp
(let ((quicklisp-init (merge-pathnames “quicklisp/setup.lisp”
(user-homedir-pathname))))
(when (probe-file quicklisp-init)
(load quicklisp-init)))

4. install slime to sbcl
First in SBCL run:
(ql:quickload “quicklisp-slime-helper”)

5. make relation with emacs
To do that, add the following to ~/.emacs:
(setq inferior-lisp-program “sbcl”)
(load (expand-file-name “~/quicklisp/slime-helper.el”))

6. start you emacs and enjoy lisp
launch Emacs, type Alt-x (Meta-x, technically), and type in “slime”. Hit enter
and you should find yourself at a CL-USER prompt within Emacs.

http://www.mohiji.org/2011/01/31/modern-common-lisp-on-linux/