重用eclipse中的preference

You can manager preference in two approaches.
1. export/import preferences
1.1 setting preferences in eclipse
1.2 export preferences
1.3 import preferences

2.using -pluginCustomization arguments

2.1 Find the \configuration\config.ini file. open it, and find the id for the
active product(eclipse.product).
For Eclipse the entry will be eclipse.product=org.eclipse.platform.ide. Note
that the active product could also
be defined using an invocation parameter. (-product productId)
2.2 Find the branding plug-in for the product. The product value is the
concatenation of a plug-in id and
an extension id from that plug-in. Look in the \plugins directory for a plug-
in with an id similar to the
product id and see if you can find a file named plugin_customization.ini.
Feature can alos have a branding plug-in. For Eclipse and many Eclipse-base
products the ids are the same,
but the feature.xml file for the product’s feature could be identifying an
alternate branding plug-in using
the plugin=”another.plugin.id.value” attribute for the element.
2.3 Copy the plugin_customization.ini file to a private location, maybe even
your eclipse root directory.
2.4 Add or modify the plugin_customization.ini file content to suite your
needs.
2.5 Invoke Eclipse with the approprocate parameter to have your file used at
runtime:

eclipse -pluginCustomization file_reference

from The Java Developer’s Guide to ECLIPSE

eclipse中的feature

Feature are the management unit for function in Eclipse.
The plug-in developer should not share plug-in without a feature; as a
consumer of plug-ins
you should demand that they be packaged using features. The Update Manager
can only manager
features; you have to work with unmanaged plug-ins by copying directories.

using about.ini file in feature you can customize eclipse

例如:

from The Java Developer’s Guide to ECLIPSE
http://www.ibm.com/developerworks/opensource/library/os-ecfeat/

eclipse中的configuration

Be default, Eclipse uses a single configuration for a given installation. The
configuration information is saved in the platform.xml file found in the
\configuration\org.eclipse.update dirctory. Them primary content in the
configuration is a list install sites. An install site is a location on the
file
system where an eclipse directory tree. with feature and plugins directories,
can be found.
The configuration identifies what install sites are accessible, lists the
features that
exist in each site, and determines what features are available and active when
Eclipse is started.
The platform:/base/ site is a reference to the eclipse directory structure
from which the eclipse.exe

was started.

解压后的configuration目录

D:\eclipse\eclipse-rcp-indigo-SR1-win32\eclipse\configuration >dir
Volume in drive D is TOOLS
Volume Serial Number is 7899-0DA2

Directory of D:\eclipse\eclipse-rcp-indigo-SR1-win32\eclipse\configuration

2012-10-17 13:45

.
2012-10-17 13:45 ..
2011-11-02 14:44 .settings
2012-10-12 15:35 873 config.ini
2012-10-12 16:52 org.eclipse.core.runtime
2011-11-02 14:43 org.eclipse.equinox.app
2011-11-02 11:41 org.eclipse.equinox.simpleconfigurator
2011-11-02 11:41 org.eclipse.equinox.source
2012-10-12 16:52 org.eclipse.osgi
2011-11-02 14:44 org.eclipse.ui.intro.universal
2012-10-17 13:45 org.eclipse.update
1 File(s) 873 bytes
10 Dir(s) 5,241,536,512 bytes free

The default configuration is used when Eclipse is launched and applies to
any workspace that might be accessed. The -configuration startup parameter
can
be used to identify an alternnative configuration.

A configuration is a list of install sites and the features found in each of
these install sites.
An install site is a location that contains features and plug-ins that can be
included in the
configuration. The Update Manager processes the content of the features and
plugins directiries of

the install site; if the content is valid, it can be included in
configuration.

platform.xml文件的部分内容

<?xml version="1.0" encoding="UTF-8"?>
<config date="1350027346671" transient="false" version="3.0">
<site enabled="true" policy="USER-EXCLUDE" updateable="true" url="platform:/base/">
<feature id="org.eclipse.wst.xml_ui.feature" plugin-identifier="org.eclipse.wst.xml.ui" url="features/org.eclipse.wst.xml_ui.feature_3.3.1.v201108102009-7H7EFZ3DxumTlaI6nheRdHo2p1KaDIL1Uz-S3PL/" version="3.3.1.v201108102009-7H7EFZ3DxumTlaI6nheRdHo2p1KaDIL1Uz-S3PL">
</feature>
<feature id="org.eclipse.equinox.p2.core.feature" url="features/org.eclipse.equinox.p2.core.feature_1.0.1.R37x_v20110906-8290FZ3FUqIcLqkVkEaTdn_14C7G/" version="1.0.1.R37x_v20110906-8290FZ3FUqIcLqkVkEaTdn_14C7G">
</feature>

</site>
</config>

说白了,configuration的目的就是用来指定Eclipse启动时会加载哪些plugins,会使用哪些branding,会使用哪些参数等。

具体的启动参数可以参见:


http://help.eclipse.org/indigo/index.jsp?topic=%2Forg.eclipse.platform.doc.isv%2Freference%2Fmisc%2Fruntime-
options.html


http://help.eclipse.org/indigo/index.jsp?topic=%2Forg.eclipse.platform.doc.user%2Ftasks%2Frunning_eclipse.htm

from The Java Developer’s Guide to ECLIPSE

什么是OSGi

什么是OSGi
The Open Services Gateway Initiative (OSGi), also known as the Dynamic Module
System for Java,
OSGi也被称为Dynamic Module System for Java
defines an architecture for modular application development. OSGi container
implementations such as Knopflerfish, Equinox,
OSGi对模块化开发定义了一个体系。OSGi容器实现(有Knopflerfish, Equinox, Apache Felix)
and Apache Felix allow you to break your application into multiple modules and
thus more easily manage cross-dependencies between them.
允许将应用程序分割成多个模块,同时使得不同模块之间的依赖易于管理。

Similar to the Java Servlet and EJB specifications, the OSGi specification
defines two things:
和Java Servlet,EJB相似,OSGi标准定义了两件事:
a set of services that an OSGi container must implement
一堆OSGi容器需要实现的service
a contract between the container and your application.
容器和你的程序之间的契约

Developing on the OSGi platform means first building your application using
OSGi APIs, then deploying it in an OSGi container.
基于OSGi平台进行开发意味着必须要用OSGi API来构建你的程序,然后将它们部署到OSGi容器中去。
From a developer’s perspective, OSGi offers the following advantages:
从一个开发者的角度来书,OSGi提供了以下优点:
You can install, uninstall, start, and stop different modules of your
application dynamically without restarting the container.
你可以在不重启容器的情况下,来安装,卸载,启动停止你应用程序中的模块。
Your application can have more than one version of a particular module running
at the same time.
同一时间你的应用程序中的一个模块的不同版本可以一起运行
OSGi provides very good infrastructure for developing service-oriented
applications, as well as embedded, mobile, and rich internet apps.
OSGi为面向服务应用提供了很好的基础框架,例如嵌入式,手机,富internet程序。

http://en.wikipedia.org/wiki/OSGi
http://www.javaworld.com/javaworld/jw-03-2008/jw-03-osgi1.html?page=1

java中的classloader

Because class loaders exist, the Java run time does not need to know
anything about files and file systems
when running Java programs.

A class loader starts by being a subclass of java.lang.ClassLoader. The only
abstract method that must be implemented is loadClass(). The flow of
loadClass() is as follows:

Verify class name.
Check to see if the class requested has already been loaded.
Check to see if the class is a “system” class.
Attempt to fetch the class from this class loader’s repository.
Define the class for the VM.
Resolve the class.
Return the class to the caller.

In Java, a class is identified by its fully qualified class name. The fully
qualified class name consists of the package name and the class name. But a
class is uniquely identified in a JVM using its fully qualified class name
along with the instance of the ClassLoader that loaded the class
. Thus, if
a class named Cl in the package Pg is loaded by an instance kl1 of the class
loader KlassLoader, the class instance of C1, i.e. C1.class is keyed in the
JVM as (Cl, Pg, kl1). This means that the two class loader instances (Cl, Pg,
kl1) and (Cl, Pg, kl2) are not one and the same, and classes loaded by them
are also completely different and not type-compatible to each other.

例如:图 _MultipleClassLoader s loading the same Target class in the same
JVM _

Target target3 = (Target) target2;

在运行时会抛出ClassCastException

http://onjava.com/pub/a/onjava/2005/01/26/classloading.html?page=1

http://www.javaworld.com/javaworld/jw-10-1996/jw-10-indepth.html?page=1

http://www.ibm.com/developerworks/java/tutorials/j-classloader/

java中的volatile是干什么的

Synchronization represses this caching behavior. According to the Java memory
model, a thread’s local memory is reset to the values stored in main memory
when the thread acquires a lock. Furthermore, local memory values are written
back to main memory when the thread releases that lock.

Unfortunately, excessive synchronization can cause a program’s performance to
suffer. To balance the need to (occasionally) avoid local memory versus not
sacrificing performance, Java provides the volatile keyword. For
each variable marked with that keyword, Java reads that variable’s value from
main memory, and writes that variable’s value to main memory. Local memory is
avoided.

一句话,就是不让JVM将改变了放到CPU的缓存中,来提高性能,而每次的读写都从

内存中进行。避免不同线程之间访问统一数据时的不一致。

http://today.java.net/pub/a/today/2004/08/02/sync1.html

http://today.java.net/pub/a/today/2004/09/15/sync2.html

如何识别class文件的版本号

javap -verbose youclassfile| grep version

file yourclassfile

运行例:

[jialiang@localhost test]$ javap -verbose HelloWorld.class | grep version
minor version: 0
major version: 46
[jialiang@localhost test]$ file HelloWorld.class
HelloWorld.class: compiled Java class data, version 46.0

javaldx是干什么的

javaldx is necessary to make Java work on some UNIX platforms.It prints a
string to std out that consists of directories which have to be included into
the LD_LIBRARY_PATH variable.The setting of the variable usually occurs in a
shell script that runs javaldx.
The directories are from the chosen java installation.
Options are:
--help or -h
[jialiang@localhost ure]$ ./bin/javaldx

/usr/lib/jvm/java-1.6.0-openjdk-1.6.0.0.x86_64/jre/lib/amd64/client:/usr/lib/jvm/java-1.6.0-openjdk-1.6.0.0.x86_64/jre/lib/amd64/native_threads:/usr/lib/jvm/java-1.6.0-openjdk-1.6.0.0.x86_64/jre/lib/amd64

一句话,javaldx就是让OO可以正常使用java必须添加到LD_LIBRARY_PATH中的lib

UNOjava组件的创建流程

UNO Components

This section will explain some very basic things about UNO components. You can
skip it if you already know it. First I will explain what a component is and
its main parts. Afterwards, I will explain what is needed to create a UNO
component to help you to fully understand the different tools and their use
during the tutorial.

Components anatomy

“A component is a system element offering a predefined service and able to
communicate with other components”
explains Wikipedia (Fr) (Even thought there is a definition
on the English wikipedia article, I prefer the French one because of its
completeness). In UNOs case a component will generally be delivered as a
package containing a library (share library in C++ or jar in Java). For UNO, a
component is made of two distinct parts: specifications and an implementation.

  • Specification: definition in a common language of what the component should do. For UNO, this language is called UNO-IDL and is more or less similar to Corba IDL. The documented part that will be provided as an API to use the component is the specification. Thus, it should be complete and implementation independent.
  • Implementation: is the code that will realize what is described in the component specifications. This programming language can either be C++, Java, Python or others. This is the internal part of the component and will not be accessible from another component.

In order that UNO knows which implementation corresponds to which
specification, the component will use registries. There are two of them: the
first one describes all the component specifications ( types.rdb ) and the
second translates the implementation into specifications ( services.rdb )
and is generated from the implementation.

Components creation process

The following diagram will help you better understand what should be done to
get a component from its specification and sources. As shown by the diagram,
the specifications are compiled and merged into one types.rdb registry. Class files are generated from that file to translate the specifications
into a Java class definition file which is built with the implementation into
a class using the java compiler. All the classes are delivered as a jar file with a specific manifest as we will see further in this tutorial. This
doesn’t make a usable OpenOffice.org: the types.rdb and jar file will
have to be zipped into a .uno.pkg file described with another manifest.
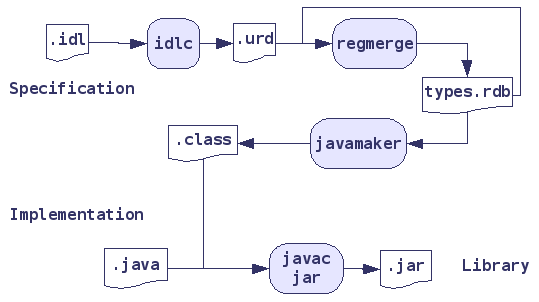
http://wiki.openoffice.org/wiki/JavaEclipseTuto

例子:

0. prepare environment

cd /usr/lib64/openoffice.org/basis3.1/sdk

./setsdkenv_unix

1. create interface

XHelloWorld.idl

HelloWorld.idl

用idl语言来描述你自己需要向外部暴露的接口
2. idlc
idlc -C -I$OO_SDK_HOME/idl XHelloWorld.idl
idlc -C -I$OO_SDK_HOME/idl HelloWorld.idl
3. /UCR key (UNO core reflection)
regmerge thumbs.rdb /UCR XHelloWorld.urd
regmerge thumbs.rdb /UCR HelloWorld.urd

#check it
regview thumbs.rdb
4.
javamaker -Gc -BUCR -O./classes $OO_SDK_URE_HOME/share/misc/types.rdb
thumbs.rdb
5. implements interface and compile
javac -classpath
./classes:$OO_SDK_URE_HOME/share/java/juh.jar:$OO_SDK_URE_HOME/share/java/jurt.jar:$OO_SDK_URE_HOME/share/java/ridl.jar:$OO_SDK_URE_HOME/share/java/unoloader.jar
-d ./classes
/home/jialiang/workspace_uno_test/uno_test/src/org/openoffice/test/comp/HelloWorldImpl.java
6. deploy
jar cfm HelloWorldImpl.jar HelloWorldImpl.mf -C ./classes .

regcomp -register -r thumbs.rdb -br $OO_SDK_URE_HOME/share/misc/services.rdb
-br $OO_SDK_URE_HOME/share/misc/types.rdb -br thumbs.rdb -l
com.sun.star.loader.Java2 -c
file:///$OO_SDK_HOME/../program/classes/HelloWorldImpl.jar
7. install to OO, and test it

cd $OO_SDK_HOME/../program

su root

vi fundamentalbasisrc

append your jar file to URE_MORE_JAVA_TYPES path

append your rdb file to URE_MORE_SERVICES and URE_MORE_TYPES path

Sub Main 
    oTestComp = createUnoService("org.openoffice.test.HelloWorld")
    MsgBox oTestComp.dbg_methods
    MsgBox oTestComp.dbg_properties
    print oTestComp.getHelloWorld()
    oTestComp.DestinationDirectory = "test"
    print oTestComp.DestinationDirectory    
end sub 

XHelloWorld.idl:

#ifndef _org_openoffice_test_XImageShrink_idl_
#define _org_openoffice_test_XImageShrink_idl_

#include <com/sun/star/uno/XInterface.idl>
#include <com/sun/star/awt/Size.idl>

module org { module openoffice { module test {

interface XHelloWorld {

  [attribute] string SourceDirectory;
  [attribute] string DestinationDirectory;
  string getHelloWorld();
  void printHelloWorld();

};

}; }; };

#endif

HelloWorld.idl:

#ifndef __org_openoffice_test_hellworld_idl__
#define __org_openoffice_test_hellworld_idl__

#include <XHelloWorld.idl>
module org { module openoffice { module test {     

    service HelloWorld : org::openoffice::test::XHelloWorld {

    };

 }; }; };
#endif

HelloWorldImpl.java:

package org.openoffice.test.comp;

import org.openoffice.test.XHelloWorld;

import com.sun.star.lang.XSingleServiceFactory;
import com.sun.star.lang.XMultiServiceFactory;
import com.sun.star.registry.XRegistryKey;
import com.sun.star.comp.loader.FactoryHelper;
import com.sun.star.lib.uno.helper.WeakBase;

public class HelloWorldImpl extends WeakBase implements
        com.sun.star.lang.XServiceInfo, org.openoffice.test.XHelloWorld {

    com.sun.star.uno.XComponentContext xComponentContext = null;

    // maintain a static implementation id for all instances of HelloWorld
    // initialized by the first call to getImplementationId()
    static byte[] _implementationId;

    // hold the service name in a private static member variable of the class
    protected static final String __serviceName = "org.openoffice.test.HelloWorld";

    String destDir = "";
    String sourceDir = "";

    /** Creates a new instance of HelloWorld */
    public HelloWorldImpl() {
    }

    // static __getServiceFactory() Implementation
    public static XSingleServiceFactory __getServiceFactory(String implName,
            XMultiServiceFactory multiFactory,
            com.sun.star.registry.XRegistryKey regKey) {

        com.sun.star.lang.XSingleServiceFactory xSingleServiceFactory = null;
        if (implName.equals(HelloWorldImpl.class.getName()))
            xSingleServiceFactory = FactoryHelper.getServiceFactory(
                    HelloWorldImpl.class, HelloWorldImpl.__serviceName, multiFactory,
                    regKey);

        return xSingleServiceFactory;
    }

    public static boolean __writeRegistryServiceInfo(XRegistryKey regKey) {
//        System.out.println(HelloWorldImpl.class.getName());
        return FactoryHelper.writeRegistryServiceInfo(
                HelloWorldImpl.class.getName(), __serviceName, regKey);
    }

    @Override
    public String getSourceDirectory() {
        return sourceDir;
    }

    @Override
    public void setDestinationDirectory(String str) {
        destDir = str;
    }

    @Override
    public void setSourceDirectory(String str) {
        sourceDir = str;
    }

    // XServiceInfo implementation
    @Override
    public String getImplementationName() {
        return getClass().getName();
    }

    @Override
    public boolean supportsService(String serviceName) {
        if (serviceName.equals(__serviceName))
            return true;
        return false;
    }

    @Override
    public String[] getSupportedServiceNames() {
        return new String[] { __serviceName };
    }

    @Override
    public String getHelloWorld() {
        return "Hello World";
    }

    @Override
    public void printHelloWorld() {
        System.out.println("Hello World");
    }

    @Override
    public String getDestinationDirectory() {
        return destDir;
    }

}

HelloWorldImpl.mf:

Manifest-Version: 1.0
RegistrationClassName: org.openoffice.test..comp.HelloWorldImpl

注意:我的OO版本是3.1,不同的版本可能不一样。